> For the complete documentation index, see [llms.txt](https://docs.hidemium.io/llms.txt). Markdown versions of documentation pages are available by appending `.md` to page URLs; this page is available as [Markdown](https://docs.hidemium.io/hidemium-4/iv.-tu-dong-hoa-automation-and-ai/automation-foundation-automation-co-ban/other/handle-dialog.md).
# Handle Dialog
#### 1. Khái niệm cơ bản về DIALOG
**Dialog** (hộp thoại) là một giao diện người dùng mà ứng dụng sử dụng để tương tác với người dùng. Nó thường xuất hiện dưới dạng cửa sổ nhỏ và có thể chứa các thông báo, câu hỏi, hoặc yêu cầu thông tin từ người dùng.
Có một số loại Dialog phổ biến như sau:
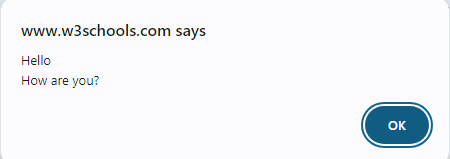
**– Alert Dialog**
* * Hiển thị thông báo cho người dùng và thường có nút “OK” để đóng hộp thoại.
* Ví dụ: Thông báo lỗi, cảnh báo, hoặc thông điệp thành công.
 **– Confirm Dialog**
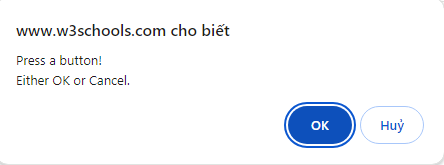
* * Cung cấp một câu hỏi với tùy chọn “OK” và “Cancel”.
* Thường được sử dụng để xác nhận hành động của người dùng, như xóa tệp hoặc thoát ứng dụng.
**– Confirm Dialog**
* * Cung cấp một câu hỏi với tùy chọn “OK” và “Cancel”.
* Thường được sử dụng để xác nhận hành động của người dùng, như xóa tệp hoặc thoát ứng dụng.
 **– Prompt Dialog**
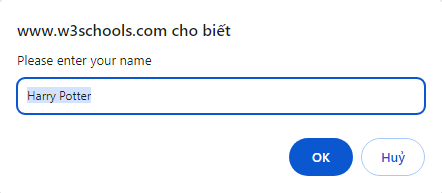
* * Hiển thị một trường nhập liệu cùng với các nút “OK” và “Cancel”.
* Dùng để thu thập thông tin từ người dùng, chẳng hạn như tên hoặc địa chỉ email.
**– Prompt Dialog**
* * Hiển thị một trường nhập liệu cùng với các nút “OK” và “Cancel”.
* Dùng để thu thập thông tin từ người dùng, chẳng hạn như tên hoặc địa chỉ email.
 #### 2. Giải thích các trường trong node Handle dialog
Khi Dialog hiện lên thì ta thường không thể thao tác được gì với trang web nếu không đóng Dialog. Khi đó ta cần sử dụng node Handle dialog để đóng hộp thoại được mở lên đó.
#### 2. Giải thích các trường trong node Handle dialog
Khi Dialog hiện lên thì ta thường không thể thao tác được gì với trang web nếu không đóng Dialog. Khi đó ta cần sử dụng node Handle dialog để đóng hộp thoại được mở lên đó.
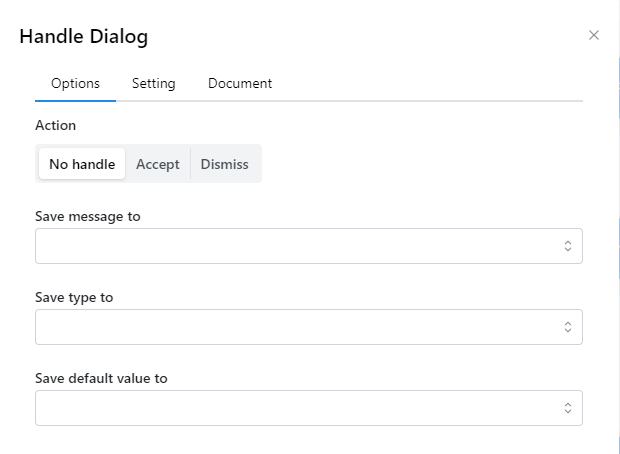 Tại node Handle dialog ta có 3 action:
– No handle: Sẽ không làm gì cả và dialog vẫn sẽ hiển thị trên trang web.
* * Save message to: Lưu message vào biến và bạn chọn.
* Save type to: Lưu lại type của Dialog như Alert, Confirm, Prompt vào biến.
* Save default value to: Lưu giá trị mặc định trong dialog vào biến.
– Accept: Thường trong dialog sẽ có 2 button “OK” và “Cancel”, khi bạn chon action accept thì giống như việc bạn click vào button “OK” của dialog.
* * Prompt input: Trong **Prompt Dialog** thường sẽ hiển thị thêm một ô input để nhập dữ liệu. Khi bạn nhập vào trường Prompt input, giá trị mà bạn nhập vào sẽ được nhập vào ô input của dialog.
* Save message to: Lưu message vào biến và bạn chọn.
* Save type to: Lưu lại type của Dialog như Alert, Confirm, Prompt vào biến.
* Save default value to: Lưu giá trị mặc định trong dialog vào biến.
– Dismiss: Thường trong dialog sẽ có 2 button “OK” và “Cancel”, khi bạn chon action Dimiss thì giống như việc bạn click vào button “Cancel” của dialog.
* * Save message to: Lưu message vào biến và bạn chọn.
* Save type to: Lưu lại type của Dialog như Alert, Confirm, Prompt vào biến.
* Save default value to: Lưu giá trị mặc định trong dialog vào biến.
**Lưu ý: node Handle dialog phải được sử dụng trước khi dialog xuất hiện. Có nghĩa là khi click vào 1 button nào đó thì sẽ xuất hiện dialog, thì node Handle dialog sẽ được dùng trước node click.**
#### 3. Ví dụ thực tế
**a. Alert dialog**
Bạn có thể tham khảo ví dụ thực tế về Alert Dialog tại đây:
Tại node Handle dialog ta có 3 action:
– No handle: Sẽ không làm gì cả và dialog vẫn sẽ hiển thị trên trang web.
* * Save message to: Lưu message vào biến và bạn chọn.
* Save type to: Lưu lại type của Dialog như Alert, Confirm, Prompt vào biến.
* Save default value to: Lưu giá trị mặc định trong dialog vào biến.
– Accept: Thường trong dialog sẽ có 2 button “OK” và “Cancel”, khi bạn chon action accept thì giống như việc bạn click vào button “OK” của dialog.
* * Prompt input: Trong **Prompt Dialog** thường sẽ hiển thị thêm một ô input để nhập dữ liệu. Khi bạn nhập vào trường Prompt input, giá trị mà bạn nhập vào sẽ được nhập vào ô input của dialog.
* Save message to: Lưu message vào biến và bạn chọn.
* Save type to: Lưu lại type của Dialog như Alert, Confirm, Prompt vào biến.
* Save default value to: Lưu giá trị mặc định trong dialog vào biến.
– Dismiss: Thường trong dialog sẽ có 2 button “OK” và “Cancel”, khi bạn chon action Dimiss thì giống như việc bạn click vào button “Cancel” của dialog.
* * Save message to: Lưu message vào biến và bạn chọn.
* Save type to: Lưu lại type của Dialog như Alert, Confirm, Prompt vào biến.
* Save default value to: Lưu giá trị mặc định trong dialog vào biến.
**Lưu ý: node Handle dialog phải được sử dụng trước khi dialog xuất hiện. Có nghĩa là khi click vào 1 button nào đó thì sẽ xuất hiện dialog, thì node Handle dialog sẽ được dùng trước node click.**
#### 3. Ví dụ thực tế
**a. Alert dialog**
Bạn có thể tham khảo ví dụ thực tế về Alert Dialog tại đây:
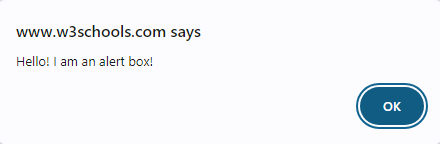 Khi muốn đóng Dialog này thì tại node Handle dialog bạn sẽ dùng như sau:
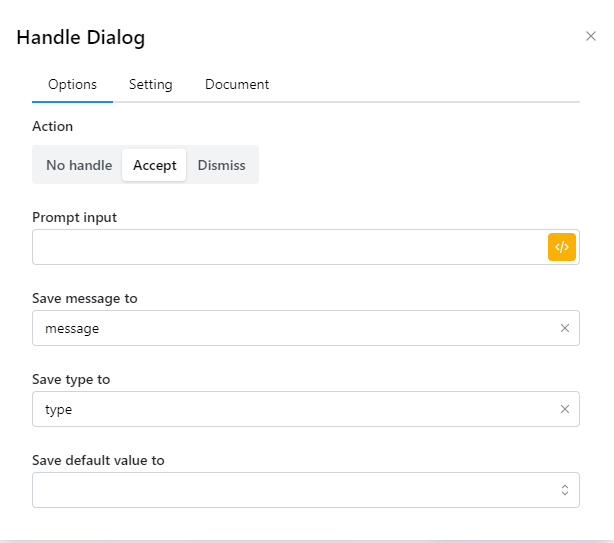 Action thì bạn chọn là Accept tương ứng với OK. Trường **Save message to** sẽ lưu “Hello! I am an alert box!” vào biến **message**. Trường **Save type to** sẽ lưu type của dialog là **alert** vào biến **type**
**b. Confirm dialog**
Bạn có thể tham khảo ví dụ thực tế về Alert Dialog tại đây:
Khi muốn đóng Dialog này thì tại node Handle dialog bạn sẽ dung như sau:
* * Khi bạn muốn chọn OK tại Dialog :
Action thì bạn chọn là Accept tương ứng với OK. Trường **Save message to** sẽ lưu “Hello! I am an alert box!” vào biến **message**. Trường **Save type to** sẽ lưu type của dialog là **alert** vào biến **type**
**b. Confirm dialog**
Bạn có thể tham khảo ví dụ thực tế về Alert Dialog tại đây:
Khi muốn đóng Dialog này thì tại node Handle dialog bạn sẽ dung như sau:
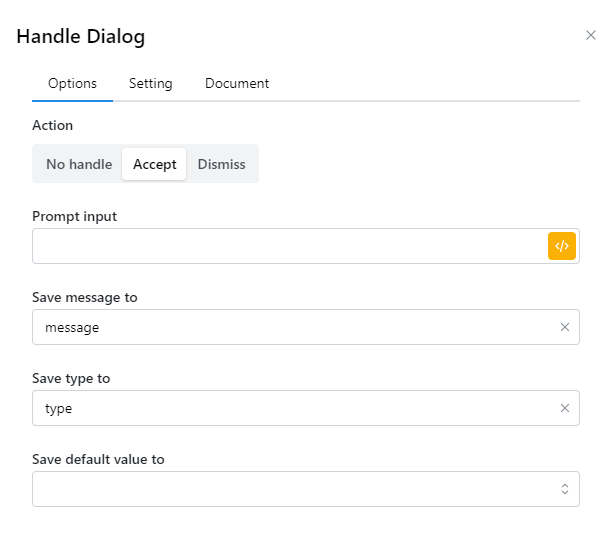
* * Khi bạn muốn chọn OK tại Dialog :
 * * Khi bạn muốn chọn **Hủy** tại dialog:
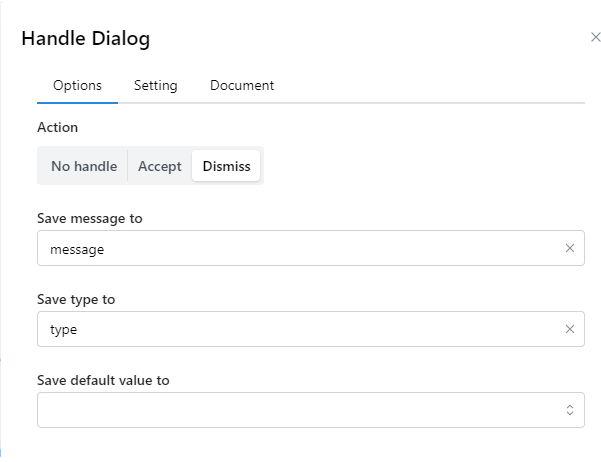 Trường **Save message to** sẽ lưu “Press a button!Either OK or Cancel.” vào biến **message**. Trường **Save type to** sẽ lưu type của dialog là **confirm** vào biến **type.**
**c. Prompt dialog**
Bạn có thể tham khảo ví dụ thực tế về Alert Dialog tại đây:
Khi muốn đóng Dialog này thì tại node Handle dialog bạn sẽ dung như sau:
* * Khi bạn muốn chọn OK tại Dialog :
Trường **Save message to** sẽ lưu “Press a button!Either OK or Cancel.” vào biến **message**. Trường **Save type to** sẽ lưu type của dialog là **confirm** vào biến **type.**
**c. Prompt dialog**
Bạn có thể tham khảo ví dụ thực tế về Alert Dialog tại đây:
Khi muốn đóng Dialog này thì tại node Handle dialog bạn sẽ dung như sau:
* * Khi bạn muốn chọn OK tại Dialog :
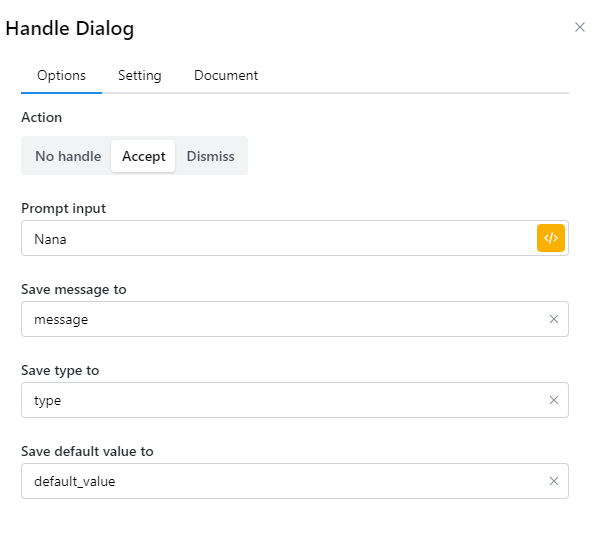 Prompt dialog này có 1 ô input, tại trường **prompt input** của node, ta có thể nhập giá trị khác vào thay thế cho giá trị mặc định của prompt dialog. Như trong ví dụ này ta sẽ thay thế Harry Potter bằng Nana.
Trường **Save message to** sẽ lưu “Please enter your name” vào biến **message**. Trường **Save type to** sẽ lưu type của dialog là **prompt** vào biến **type.** Trường Save default value to sẽ lưu giá trị mặc định ban đầu của ô input trong dialog là “Harry Potter” vào biến **default\_value**
* * Khi bạn muốn chọn **Hủy** tại dialog:
Prompt dialog này có 1 ô input, tại trường **prompt input** của node, ta có thể nhập giá trị khác vào thay thế cho giá trị mặc định của prompt dialog. Như trong ví dụ này ta sẽ thay thế Harry Potter bằng Nana.
Trường **Save message to** sẽ lưu “Please enter your name” vào biến **message**. Trường **Save type to** sẽ lưu type của dialog là **prompt** vào biến **type.** Trường Save default value to sẽ lưu giá trị mặc định ban đầu của ô input trong dialog là “Harry Potter” vào biến **default\_value**
* * Khi bạn muốn chọn **Hủy** tại dialog:
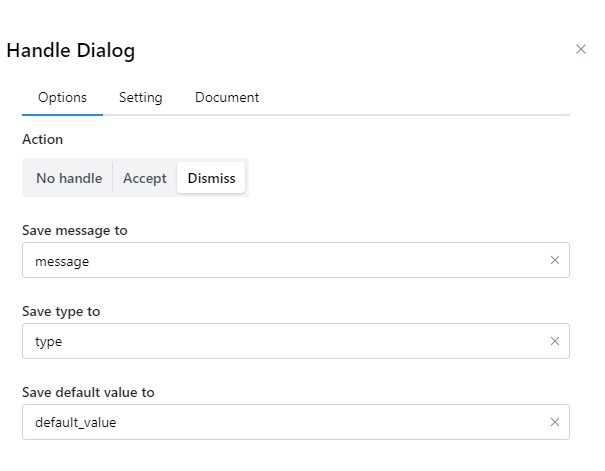 Trường **Save message to** sẽ lưu “Please enter your name” vào biến **message**. Trường **Save type to** sẽ lưu type của dialog là **prompt** vào biến **type.** Trường Save default value to sẽ lưu giá trị mặc định ban đầu của ô input trong dialog là “Harry Potter” vào biến **default\_value**